


How to Photoshop Pictures (Simple 3 Step Beginners Guide)
Learn how to turn a mediocre picture into something to be proud of in this beginner's guide to editing a picture in Adobe Photoshop.
Photoshop | Software | By Judyth Satyn
Photo editing is capable of turning a mediocre picture into an astounding work of art.
You can use simple photo editing tricks in Photoshop to highlight the attributes of an image, fix blemishes and remove unwanted objects.
Since Photoshop is a complicated piece of editing software with hundreds of ways to achieve the same outcome, it’s important to simplify the steps.
If all you want to know is how to Photoshop a picture, I’ve distilled this down to 3 essential steps.
I’ve also included some basic photo editing tips for the absolute beginner.
Read on to learn more.

Download the latest version of Adobe Photoshop to follow along with this simple tutorial.
Start a free 7-day trial today
Table of Contents
How to Photoshop Pictures in 3 Essential Steps
Step 1 – Crop
Cropping an image is a great place to start when editing photos.
There are a few reasons to crop an image, the classic rule of thirds, to focus the viewer’s eye and to remove unwanted items.
The Rule of Thirds breaks an image down into thirds, both horizontally and vertically, it is a guideline that places the subject off-centre to create a compelling composition.
To create an interesting image you want to direct the viewer’s gaze, but if you have an image with too much background the main subject will be lost, and the viewer’s eye will wander rather then focus on the subject.
Cropping can Remove Unwanted Objects such as extra people or an ugly piece of furniture.
To crop an image in Photoshop select the Crop Tool from the Toolbar to the left of your canvas window, or use the keyboard shortcut and Press C.
When the Crop Tool is active a bounding box will appear around your image and the Crop Tool Options bar will appear above the canvas window.
![]()
In the Crop Tool Options bar, you can set the crop’s value, change the bounding box’s overlay guide, and choose to keep or delete the cropped pixels.
There is also an option to Crop and Straighten.
To crop your image, Move the Bounding Box’s Handles to the desired position by dragging the box’s edges inwards or outwards with your cursor.
![]()
The bounding box will give you a crop preview by highlighting the area which will remain once the crop is complete.
When you are happy with the crop Press Enter or Click the Tick in the far right of the Crop Tool’s options bar.
![]()
Step 2 – Fixing
Another great photo editing trick that Photoshop offers is the ability to fix blemishes and cover unwanted areas of an image.
The best tool to fix small blemishes is the Spot Healing Brush Tool.
The Spot Healing Brush Tool is quick and easy to use, it will smooth over unwanted areas of an image and works well for skin blemishes.
Select the Spot Healing Brush Tool from the Toolbar or for Keyboard Shortcut Press J.
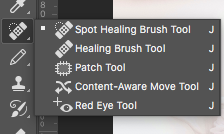
In the Tool’s Options bar set the brush size and brush over the blemish to remove it.
One of the best tools to remove unwanted objects when editing photos is the Clone Stamp Tool.
The Clone Stamp tool will replicate areas of an image, which is very useful when you want to hide an item.
Select the Clone Stamp Tool from the Toolbar or for the keyboard shortcut Press S.
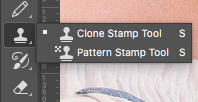
Set the size of the Clone’s Brush Tool in the Tool’s Options bar above your canvas window.
Select the area you wish to clone by holding the Alt Key as you click with your cursor on the area you wish to replicate.
Choose an area that will blend well, Release the Alt Key and paint over the area you wish to hide.

In the image above the Clone Stamp Tool was used to remove the lady’s pendant.
Other tools such as the Burn Tool, Patch Tool, and Magic Wand Tool are great for editing and worth experimenting with as you become more experienced in Photoshop editing.
Step 3 – Color Adjustments
Color adjustment is a fantastic simple photo edit that will enhance a dull image, or cool down an image with too many distracting colors.
It is wise to use an adjustment layer when editing photos as it allows you to return at any time during the editing process to re-edit without disrupting other edits.
To create a Curves Adjustment Layer select the layer you wish to edit in the layers panel and navigate to the top menu bar.
Select Layer > New Adjustment Layer and in the drop-down menu select Curves.
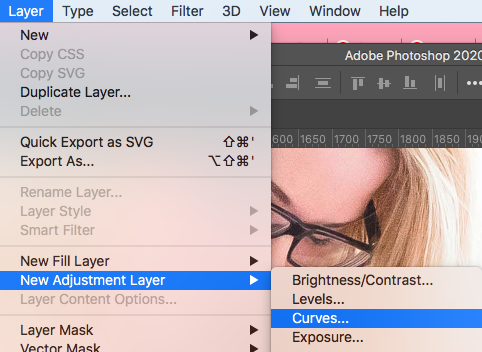
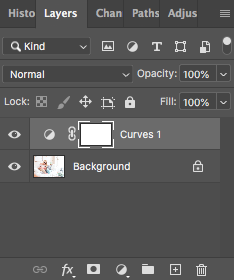
When selected an adjustment layer will be created in the Layers Panel and the Curves Properties Dialog Box will open.
To edit the image’s color tones Click on, Drag, and Release the Curve Line in the Properties Panel.
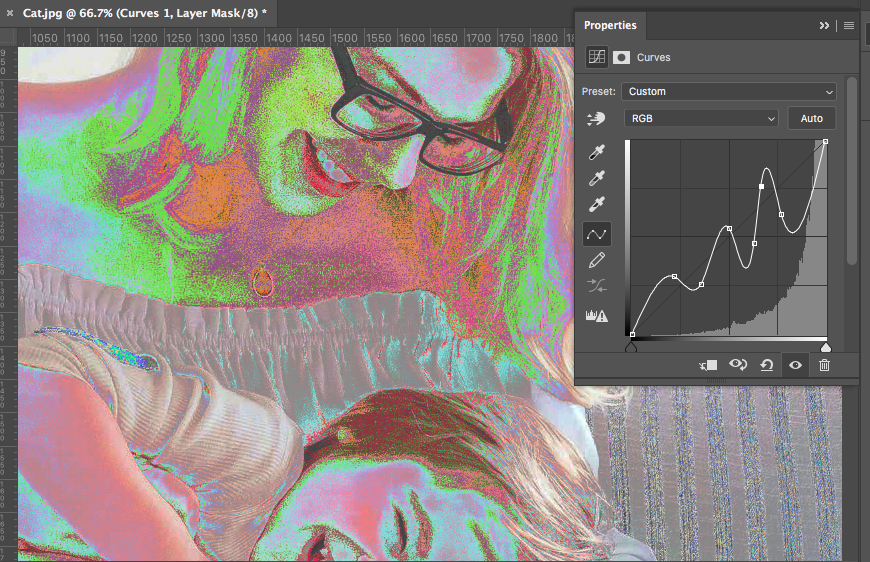
The Top of the Curve Line adjusts the highlights, the Middle the mid-tones and the Bottom adjusts the lower color tones.
Other useful adjustment layers to experiment with when editing photos are the Color Balance Adjustment Layer and the Photo Filter Adjustment Layer.
How to Photoshop a Picture for Free
If you don’t have Photoshop and you want to give it a shot, you can sign up for a free 7-day Photoshop trial right here >>.
This 7-day trial can be found on Adobe Photoshop’s website and will give you access to all of Photoshop’s features and updates.
Just remember that if you don’t cancel your Photoshop subscription before the 7 days, you will automatically be charged.
If you enjoyed this Photoshop tutorial, you might want to check out – How to create the Vignette Effect in Photoshop
 How to Photoshop Nudes Photos (Tips and Examples)
 12 Best Adobe Lightroom Alternatives in 2023 [User Tested]
 Best Photo Editing Software in 2023 (User Tested)
 33 Most Famous Film Photographers in 2023
 How to Use the Clipping Mask in Photoshop (Complete Guide)

Judyth is an experienced studio photographer and glass artist. When she isn’t Photoshopping comedians into the bellies of sharks, you can find her cooking delicious treats for her guests.

WELCOME TO SHOTKIT
Enter your email to be sent
today's Welcome Gift:
19 Photography Tools
🔥 Popular NOW:


Shotkit may earn a commission on affiliate links. Learn more.