


How to Use Selective Color in Photoshop (In 4 Quick Steps)
Learning how to use Selective Color in Photoshop can create some dramatic visual effects, perfect for online advertising or eye-catching edits to your pictures.
Photoshop | Software | By Judyth Satyn
Do you have photos you love, but the colors are faded and bland?
Photoshop’s Selective Color technique can be used to make a photo’s color range pop with vibrancy, turning it into a striking artwork.

Download the latest version of Adobe Photoshop to follow along with this simple tutorial.
Start a free 7-day trial today
Using Selective Colors Adjustment Layers, you can edit and adjust an image’s entire color balance or target a single color.
You can focus the viewer’s gaze by editing the colors of one object, so it stands apart from the rest of the image, which is great for use as personalized content and ads.
Read on and learn how to use Photoshop Selective Color for dramatic visual effects, or tap here to learn how to buy Photoshop.
Table of Contents
How to use Selective Color in Photoshop 2023
Step 1 – Open the Image
Choose your image and Open it in Photoshop.
Step 2 – Create a Selective Color Adjustment layer
To begin, we are going to create a new Adjustment Layer.
Having a separate Adjustment Layer gives you more control when editing your image.
You can remove or change the layer at any time during the editing process without compromising your image.
Navigate to the Layer menu, and in the drop-down beneath, select New Adjustment layer > Selective Color.
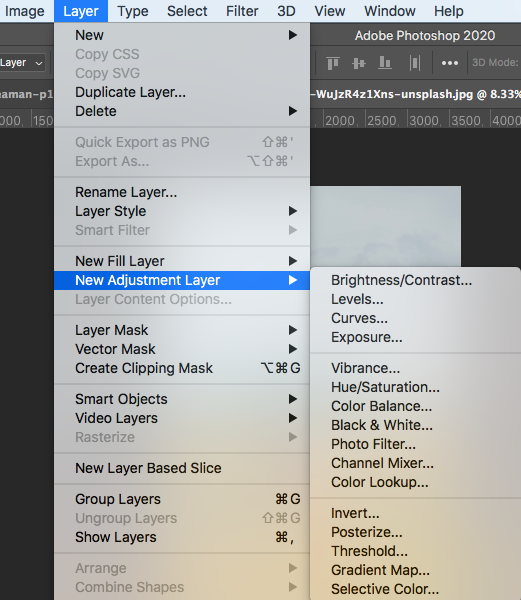
When you click on Selective Color, a dialog box will appear, prompting you to name the layer.
If you’re working with a background layer and different adjustment layers, it’s a good idea to give each layer a distinctive name. If it’s just this one you can leave it as Selective Color.
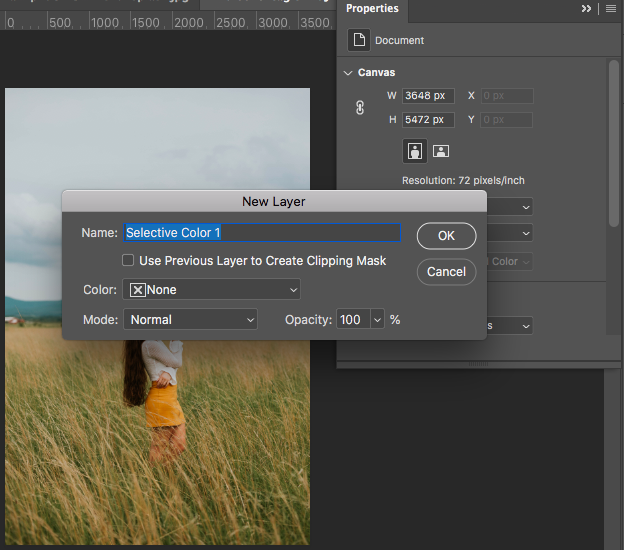
The dialog box will also give you the option to select a specific Colour, change the Mode and/or alter the Opacity of the adjustment layer.
Leave all other settings on their default settings.
Click OK and the Selective Color Adjustment Layer will be created and will be visible in the Layers Panel. A Properties Panel will also appear.
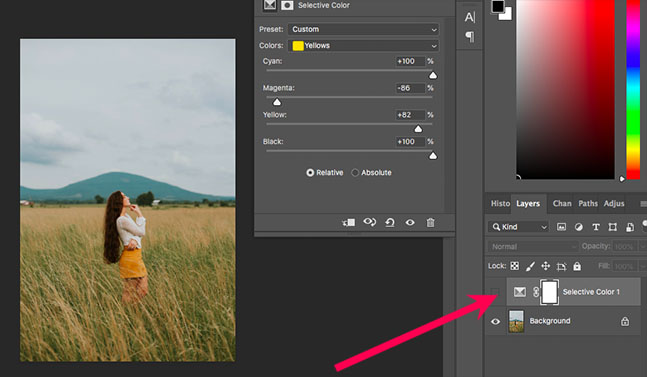
This panel gives the option for a Default or Custom Preset.
Leave the Preset setting as Default.
If you plan to use Selective Colors for repeat editing tasks, such as adding the same sepia tone to many images, you have the option to set default settings to speed up the editing process.
You can blend all or some of the layers when you have the desired result.
Step 3 – Select the Adjustment Color
Now you can choose the color you wish to change.
In the Photoshop Selective Color Properties Panel, you’ll find a selection of nine colors in the drop-down menu beside Colors: Reds, Yellows, Greens, Cyans, Blues, Magentas, Whites, Neutrals and Blacks.
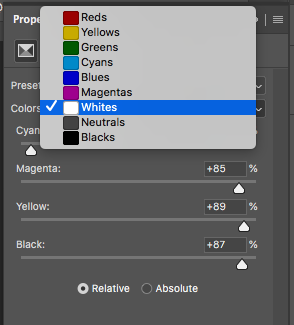
Each color in the selective colors properties tab will give you the option to further alter the levels of Cyan, Magenta, Yellow, and Black by sliding the slider to the left or right.
The sky in our selected image is a very bland white. To create a more atmospheric sky we can select White from the drop-down menu beside Colors.
Now we will be able to target the saturation of hues in the white areas of the entire image.
When moving the Cyan slider to the left or right we can increase or decrease the amount of Cyan in the selected color.
By decreasing the amount of Cyan and increasing Black, Yellow, and Magenta, we end up with a peach-colored sky.

One note of caution is that when using the Selective Color Tool, all white areas in the original image will be changed to a peach tone, thus the girl’s skin tones and shirt change too.
If you want to target one colored portion of the image only, you can separate it from the rest by using the Selective Color Layer Mask.
(Check out this tutorial if you want to edit skin tones in Photoshop: How to Change Skin Tones in Photoshop.)
Step 4 – Layer Mask
In the Selective Color Panel, click on the Layer Masks Icon (a black circle inside a white rectangle).
Leave the settings as default, and click on Color Range at the bottom of the Layer Mask Properties Panel.
The Color Range Panel will appear.
Beside Select, leave the default setting, which is Sampled Colors.
Click on the Eye Dropper and select the specific area of color from the original image which you wish to alter.
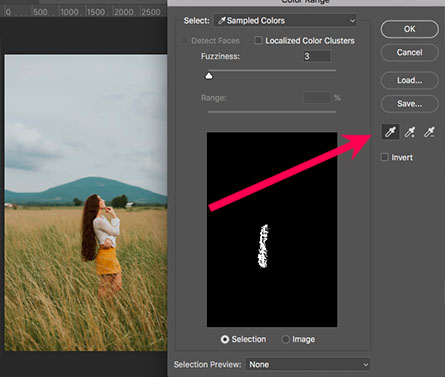
A Layer Mask will be created in the layers panel when you click with the eye dropper on the image.
You can add or subtract from your chosen area by selecting the + or – eyedropper from the Properties Panel.
You can slide the Fuzziness bar to increase the range of the chosen color.
Once you have the desired area selected, click OK.
You can now use the Selective Color Tool and alter only the color of the selected area using the sliders.
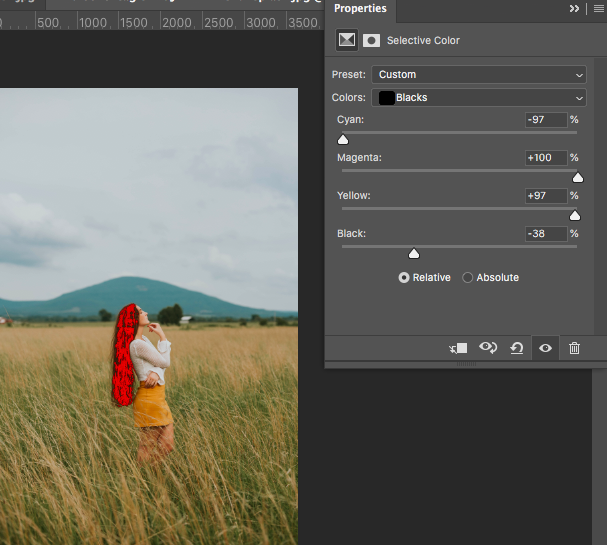
As you adjust the area’s color, the canvas window will demonstrate the editing effect.
When you’re happy with the final color, click OK.
Now you can experiment and selectively change the color of an image, or part of an image, to create unique eye-catching looks.
Shortcuts for Photoshop Selective Color
Shortcuts are a great way to speed up the editing process. So, what are the Selective Color Shortcuts?
Although there is no shortcut to open a Selective Color Adjustment Layer, there are Photoshop shortcuts allowing you to switch between colors when working on an image.
Photoshop doesn’t currently have shortcuts for White, Black, and Neutrals but does for the rest of the selective colors.
Here they are:
For Red press ALT + 3
For Yellow press ALT + 4
For Green press ALT + 5
For Cyan press ALT + 6
For Blue press ALT + 7
For Magenta press ALT + 8
This will allow you to glide smoothly between colors as you work on your image.
If you liked this Photoshop tutorial, you should check out this fun one too – How to Face Swap in Photoshop.
 33 Most Famous Film Photographers in 2023
 How to Use the Clipping Mask in Photoshop (Complete Guide)
 33 Most Famous Architecture Photographers in 2023
 26 Famous Car Photographers to Follow in 2023
 How to Photoshop Nudes Photos (Tips and Examples)
 31 Most Famous Travel Photographers to Follow in 2023

Judyth is an experienced studio photographer and glass artist. When she isn’t Photoshopping comedians into the bellies of sharks, you can find her cooking delicious treats for her guests.


WELCOME TO SHOTKIT
Enter your email to be sent
today's Welcome Gift:
19 Photography Tools
🔥 Popular NOW:


Shotkit may earn a commission on affiliate links. Learn more.