


Photoshop is packed with some fantastic options for making fiddly tasks quick and efficient and the Magic Wand tool definitely lives up to its name as it allows you to make rapid selections with minimal effort.
This guide runs you through how it works, why it works, and how to tweak it so that you can get the best out of it.
If you’ve ever asked yourself “How do I use the Magic Wand tool in Photoshop?”, then keep reading to give yourself a thorough understanding of how to get to grips with this handy tool.
(If you don’t already use Photoshop, here’s how to buy it.)

Download the latest version of Adobe Photoshop to follow along with this simple tutorial.
Start a free 7-day trial today
Table of Contents
What is the Magic Wand Tool in Photoshop?
The Magic Wand tool was one of Photoshop’s earliest features and gave users an idea of just how powerful the software was. In short, this tool allows you to make a complex selection within an image just using a single click.
While certainly behaving as though it is magic, it does have some limitations. Understanding how it works will help you to figure out when best to use it, and how to adjust the settings to improve its functionality.
When you select an image using the Magic Wand tool, Photoshop looks at the pixel you clicked on and makes a selection based on the color and tone of that pixel.
Areas of surrounding pixels that are similar in tone and color become part of the selection. Anything that is too dissimilar is ignored and left out of the selection.
This makes it ideal for quickly grabbing a subject from a relatively plain color background so that you can, for example, cut it out, copy it or create a mask.
Instead of having to draw a complicated selection around a subject manually using the lasso or pen option, you can simply get Photoshop to use some maths — I mean magic — so that it does the hard work for you!
There are times when the Magic Wand tool will prove fiddly, but there are ways to tell it to be smarter.
Where is the Magic Wand Tool in Photoshop?

The location might vary slightly depending on how you have Photoshop set up, but by default, when using the ‘Essentials’ workspace, the Magic Wand tool is the fourth icon down in the toolbar on the left-hand side.
It shares a slot with two other selection tools: the Quick Selection tool and the Object Selection tool. If you can’t see the Magic Wand tool, it might be because one of these other tools has been selected recently.
To switch the toolbar icon back to the Magic Wand tool, right-click on the Quick Selection tool or Object Selection tool to produce a fly out and then simply select the Magic Wand tool.
The keyboard shortcut to use the Magic Wand tool is W. However, pressing W might bring up the Quick Selection tool or Object Selection tool as they are grouped together under one keyboard shortcut.
To cycle between these three tools, simply press the Shift key and W to switch between the different options.
- Read more: How to add drop shadows in Photoshop
How to use the Photoshop Magic Wand Tool
When selecting the Magic Wand tool, you will see an options bar appear at the top of your workspace. These settings give you control over how it functions.
![]()
Probably the most important setting to understand in this options bar is Tolerance, so let’s start there and then move on to the second most important:
Tolerance
The Magic Wand tool is perfect for when you’re trying to select a large area similar in color and tone, but it can be frustrating to use if the area you’re trying to select is more complex.
To understand how it calculates which part of an image to select, have a look at this example:
Photoshop clearly understands that half of the image is red and the other half is blue. When you click with the Magic Wand tool on the red half, only the red pixels are selected.
(Quick tip: to deselect everything, press Command (MacOS) or Control (Windows) and D.)
However, what happens if the boundary between the two colors is not as obvious? This is where things get more complicated.
In the example below, I use the Magic Wand tool in exactly the same way but this time on an image that is a gradient that shifts slowly from red to blue. Look at what happens with the selection as I select different parts of the image, starting on the left and moving right:
Why is it selecting some of the image but not all? You could just as easily ask why is it selecting so much?
The answer is because of the Tolerance – one of the settings that determine how the Magic Wand tool functions. Once you have the tool selected, you will see the option to change Tolerance appear in the options bar at the top of the workspace.
![]()
When clicking on the red to blue gradient image in the example above, my Tolerance was set to 30. According to Adobe, Photoshop looks at the “numeric color value” of the pixel you clicked and grabs all of the pixels connected either side of it that are plus or minus 30 of that value.
It doesn’t matter too much what that means. Just remember that basically, the higher the number — up to 255 — the more pixels that the Magic Wand tool is going to grab.
Note that even when it’s set to 255, it still won’t select the bluest shades of blue:
(Quick tip: If you want to select everything, hit Command (MacOS) or Control (Windows) and A.)
In short, we can tell Photoshop how sensitive to be when making a selection using the Magic Wand tool: simply increase the Tolerance to make it select more of the image.
It’s worth remembering that the Magic Wand tool works well when the area that you want to select is distinct in color and tone from its surroundings. It’s even easier when the area within your selection itself does not contain a strong, graduated change in color and tone.
Getting the right Tolerance can occasionally be an impossible game of trial and error. Fortunately, there are other ways to improve your selection.
Four Modes: New, Add to, Subtract from, and Intersect with
Furthest left on the options bar you will find four different modes for the Magic Wand tool. The default is New Selection, and this is what you will use most often.

-
Add to Your Selection
The second mode in the options bar is Add to Selection. Once you have made a selection, you can click on other parts of the image and add to your existing selection. A quicker way is to use the keyboard shortcut: simply hold Shift when you select.
In this example, the Tolerance is set quite low — to 30 — and the Magic Wand only selects part of the sky as the sky transitions from blue to white.
I select part of the sky and then hold down Shift before clicking on the part of the sky that remained unselected. You can see a plus symbol appear next to the Magic Wand tool when I press the Shift key:
This can be very useful when you need to keep the Tolerance quite low to prevent Photoshop selecting unwanted parts of the image but still need to select a large area.
-
Remove from Selection
Like the Add to mode, you can also remove parts of your selection. Instead of choosing the mode, you can simply hold down the Option (MacOS) or Alt (Windows) key.
-
Intersect with Selection
This mode is a little more complicated. It only works if you click inside an area that you already have selected.
It allows you to refine a selection by making it smaller. Look at this example:
There are a couple of things to note here.
Firstly, when nothing is selected, the “Intersect” mode behaves just like the “New” mode. You can see this because the mouse icon hasn’t changed.
Once you have made that first selection, however, the mouse icon changes and an X appears alongside the wand.
Now when you click, the Magic Wand tool is refining the selection depending upon the pixel that I choose, but only within the existing selection. As I click further and further right, the selected area gets smaller.
Normally, it would make a new selection, but because of “Intersect” mode, the right-hand edge behaves like a barrier, stopping the tool from looking outside of the existing selection.
-
Contiguous
One of the other settings in the Magic Wand toolbar is a tickbox labelled “Contiguous.” By default, it is switched on and means that it looks only at pixels connected to the pixel you select, and not across the image as a whole.
![]()
When you untick Contiguous, the Magic Wand tool will look at the pixel that you clicked and then seek out similar pixels across the entire image.
Here’s an example that shows the difference. With Contiguous switch on, I click on part of the orange on the left of the image and Photoshop only selects an area immediately around where I clicked.
I then press Command/Control + D to deselect everything, Then I untick Contiguous, and click in the same place as before.
This time, the bar of orange on the right is included in the selection as the Magic Wand tool is now looking across all of the image for similar pixels to include.
Sample Size
Sample Size is similar to Tolerance in that it changes how the Magic Wand tool decides which other pixels to include.
By default, it is sent to Point Sample — i.e., one pixel. This means that it uses just one single pixel as the basis for its selection.
Changing the Sample Size increases the number of pixels that the Magic Wand tool uses.
Here’s an example. Note that the Tolerance is set to 5 throughout:

Each time I increase the Sample Size, the resulting selection increases in size.
Anti Alias and Sample All Layers
By default, Anti Alias is switched on as it helps Photoshop to create smoother edges where it encounters curves. Photoshop uses some funky maths to overcome the fact that pixels are square and can otherwise create blocky, jagged edges when viewed up close.
Sample All Layers comes in handy when you’re working on a document that has lots of layers. It is switched on by default, and it’s best only to switch it off when you run into problems.
How to Remove Image Background with Magic Wand Tool
Let’s start with another jumping figure and isolate him from the sky.

1. Choose the Magic Wand tool and set the Tolerance to 25.
2. Click anywhere on the sky.
3. If part of the sky is not included, hold Shift and select the areas that are not included in the selection.
4. With all of the sky selected, click on Select and Mask from the right-hand side of the options bar at the top of the workspace:

5. From this Select and Mask dialogue, refine your selection. If you need help with this, check out this great tutorial.
6. Make sure that “Output to” is set to “Layer Mask”:
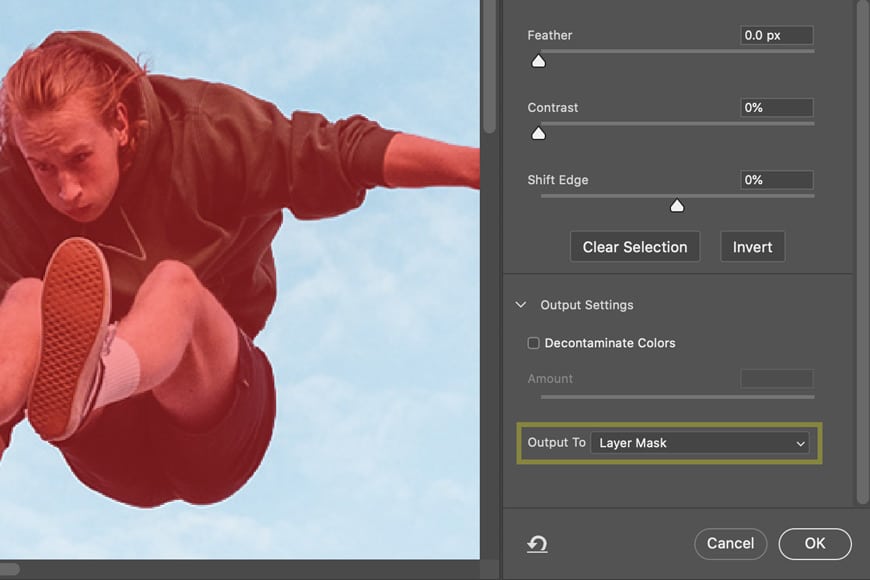
7. Our jumping guy has disappeared, leaving only the sky.

But don’t panic — we can invert the mask.
This is an important element to remember as you learn how to use Photoshop: Photoshop always masks out out the area that you have selected.
In our example, the part we don’t want to mask — i.e., the sky — is easier to select. Inverting the mask is a quick way to solve this problem.
Making sure that you have the Layer Mask selected in the Layers panel, press Command (MacOS) or Control (Windows) and I.
Alternatively, double click the Layer Mask to reopen the Select and Mask dialogue. Then click on “Invert”.
And there you go! Our flying athlete is isolated from the sky, and the background of the image has been removed.
Final Words
The Magic Wand tool isn’t quite magic, but it’s certainly powerful and can be incredibly useful once you understand its limitations. It’s not always the perfect option, but it can save you a lot of time under the right circumstances.
Hopefully, this guide has given you an in-depth understanding of how to use the Magic Wand tool but if you have any questions, make sure to leave a comment below.
Download the latest version of Adobe Photoshop to follow along with this simple tutorial.
Start a free 7-day trial today


Andy Day is a British photographer and writing, living and working in France, specialising in adventure, travel, architectural and landscape photography.


WELCOME TO SHOTKIT
Enter your email to be sent
today's Welcome Gift:
19 Photography Tools
🔥 Popular NOW:


Shotkit may earn a commission on affiliate links. Learn more.