


How to Resize an Image in Photoshop (Without Distortion)
Learn how to resize an image in Photoshop for printing, publishing, or sharing online using these simple techniques and completely avoid distortion.
Photoshop | Software | By Judyth Satyn
You might need to resize an image in Photoshop to make it fit a project.
Maybe the image is too big for a Spotify album or too small for a profile picture.
You can resize images in Photoshop using a scale tool or a resize command.
Some methods might be quick and snappy, but they can cost you dearly in quality loss, leaving you with a lower-quality image than the original.
Other techniques can result in a distorted image and unrealistic proportions leaving the subjects looking shrunken and squashed.
In this Photoshop tutorial, you will learn how to resize images without losing quality and without distortion.

Download the latest version of Adobe Photoshop to follow along with this simple tutorial.
Start a free 7-day trial today
Learn how to download Photoshop for free.
Table of Contents
How to Resize an Image in Photoshop
Method 1 – Use Image Size Adjustments
Below you will discover how to resize an image in Photoshop using Image Size Adjustment.
Image Size Adjustment is a great option for enlarging images if you have a precise size you want to achieve.
When your image is open, navigate to the Top Menu Bar and select Image, Click on Image Size in the drop-down menu.
Alternatively use the keyboard shortcuts press Option, Command, and I (for Mac) or Alt, Control, and I (for Windows).
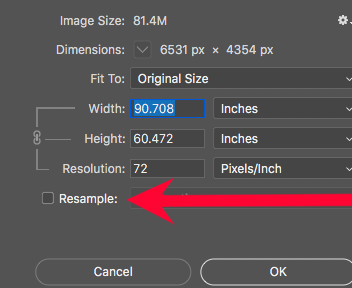
The Image Size Dialog Box will appear, containing file size, pixel dimensions, and image resolution information.
You can change the measurement unit in the Dimension Box to the one you prefer to work with.
Click on the Arrow in the small box beside Dimensions, and a drop-down menu will appear.
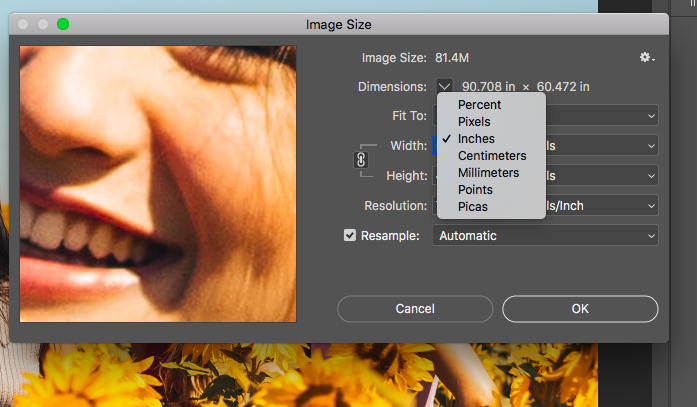
If you are working in inches, change the Dimension Setting to inches. If it is centimeters, change it to centimeters.
To resize the image Click on the Width and Height Value and type the new dimension into the boxes.
Click OK at the bottom of the Image Size dialog box or press Enter.
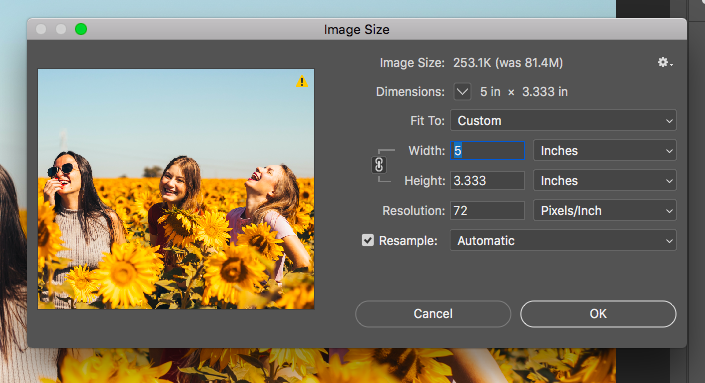
Photoshop will instantly rescale your image in size to match the dimensions you entered.
Image Size Adjustments are one of the fastest methods to resize an image to the exact desired proportions without altering image quality.
If distortion is not a concern, you can un-click the chain icon, which locks the image width and height together.
Note – Changing the image size without the chain icon locked will result in distortion.
Method 2 – The Transform Tool
The Free Transform Tool is probably the most common method used for resizing an image, easy to access and allows the editor to work with individual layers.
Here are easy steps on how to resize an image in Photoshop with the Free Transform Tool.
When your image is open select the layer, you wish to edit in the Layers Panel.
To keep the image quality intact, change your layer to a smart object before transforming the size.
To change your layer or image to a smart object, navigate to Layer in the Top Menu Bar, in the dropdown menu below select Smart Objects > Convert to Smart Object.
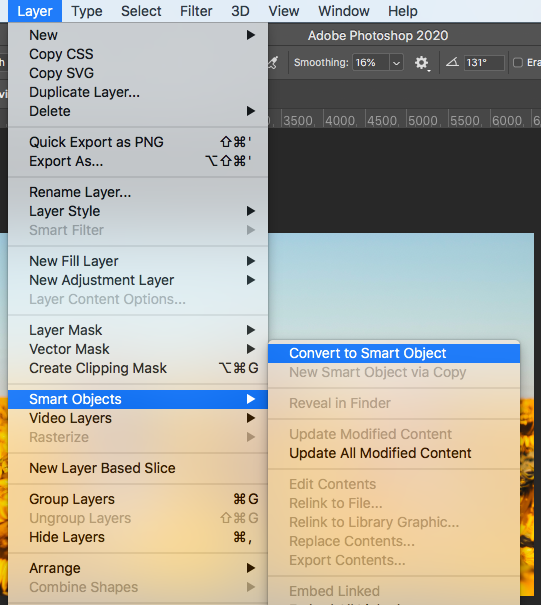
Photoshop will automatically convert the layer into a Smart Object, preserving the image’s source content.
Now you won’t have to fear losing the quality of your image when you resize it.
Navigate to the top bar and select Edit, from the dropdown menu select Transform > Scale.

To use the Photoshop Keyboard ShortCut, Press Command T (for Mac) or Ctrl T (for Windows).
The Scale option will ensure that the layer’s proportions will remain unchanged when resizing, thus no distortion of height to width proportions.
When the Transform Tool has been selected and is active, the chosen layer’s edge will be surrounded by a blue border.
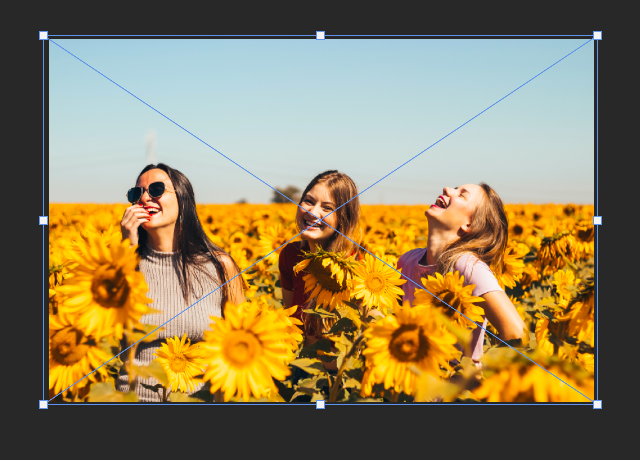
To change the layer’s size hover your cursor over the blue border until an arrow icon appears.
Click on the arrow, then hold and drag to move the edge of the layer to the desired image dimensions.
The layer will reduce or increase in size as you move the blue borderline in or out.
Release the cursor to complete image resizing.
You now have two foolproof methods to help you resize an image in Photoshop.
You can use these tricks to alter pixel dimensions or the size of an image layer without losing quality.
Why Can’t I Resize an Image in Photoshop?
Have you tried all the steps and yet your layer isn’t budging a single pixel?
It’s sitting stubbornly refusing to change width and height values, never mind pixel dimensions – what’s going on?!
There could be one of two reasons that this is happening and preventing you from resizing your image in Photoshop.
Alternatively use the keyboard short cuts press Option, Command and I (for Mac) or Alt, Control and I (for Windows)
The Image Size Dialog Box will appear, tick the box beside Resample.
Reason 2: The Image is Locked
If you still find you cannot change the size of your Photoshop document, check if your image layer is locked.
To do this go to the Layer Panel, if the layer is locked there will be a Lock Icon beside the layer thumbnail.
Click on the Lock Icon to unlock the layer.
Now you are equipped with all the information you need to start resizing images, photos, and documents.
You can also resize images with other software other than Photoshop – check out this guide for more information.
 33 Most Famous Film Photographers in 2023
 33 Most Famous Architecture Photographers in 2023
 26 Famous Car Photographers to Follow in 2023
 How to Use Photoshop Smart Objects in 2023: Create, Edit & Fix
 31 Most Famous Travel Photographers to Follow in 2023
 28 Most Famous Landscape Photographers in 2023


WELCOME TO SHOTKIT
Enter your email to be sent
today's Welcome Gift:
19 Photography Tools
🔥 Popular NOW:


Shotkit may earn a commission on affiliate links. Learn more.