


How to Take Amazing Long Exposure Photos with Your iPhone
Wondering if your iPhone takes long exposure photos? Here's how to get amazing long-exposure shots with both newer and older iPhones.
iPhone Photography | Learn | By Ashley Darrow
Smartphone photography has come a long way in recent years, but did you know that you can take long exposure iPhone pictures?
My iPhone has grown to become my everyday camera. I’ve used it to shoot everything from international adventures to still life setups at home.
However, long exposure photography is one of the most interesting things that you can do with your iPhone.
The fastest, simplest and most fun way to improve your smartphone photography skills this year.
Use link to save 80%
Long exposure photography has been used since the days of film to capture everything from spooky spirit photography to star trails in the night sky.
Today, I’m going to walk you through everything you need to start shooting long exposures on your iPhone.
Table of Contents
What Is Long Exposure Photography?
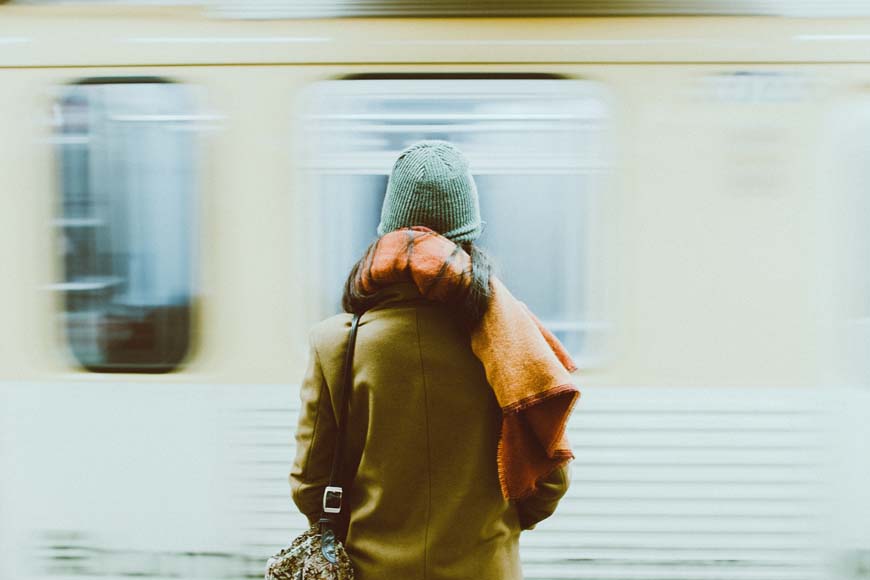
Image Credit: Jeffrey Czum
Long exposure photography, also called Slow Shutter Speed Photography, is taken with a slow shutter speed which leaves the stationary objects in sharp focus while allowing moving objects to blur, streak, or vanish entirely.
There’s no one shutter speed that defines a long exposure photograph. It’s the highlighting of motion contrasted with stationary objects that separates long exposure photography from other styles.
A 1/2 second shutter speed of athletes in motion could be considered a long exposure photograph, while you might need 30 seconds or more to capture the motion of stars in the night sky.
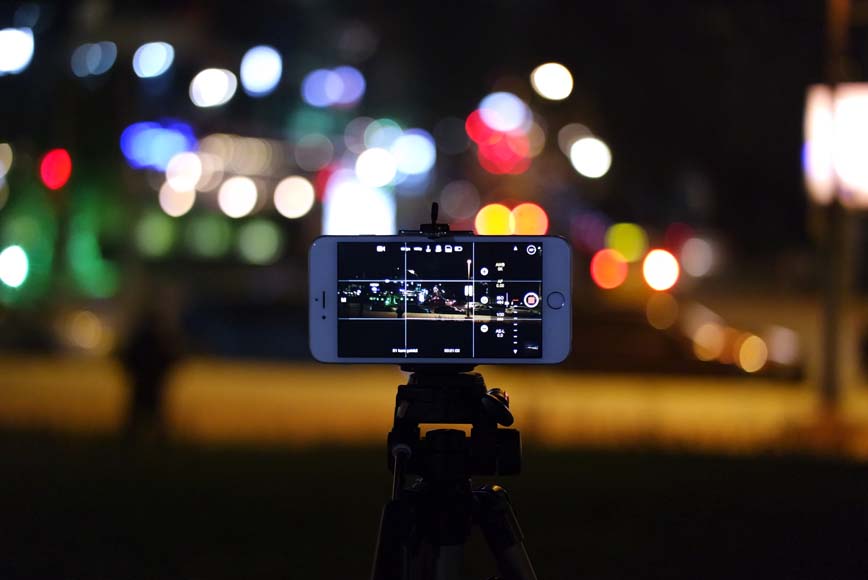
We often associate long exposure photography with night time or low light photography. This includes some classic examples like stars streaking across the night sky or the tail lights of cars leaving a trail as they drive by.
You can also take long exposure photographs during the day. A long exposure photograph of waves rolling on the ocean creates a misty look that contrasts with the sharp clarity of a fast shutter speed.
Can You Do Long Exposure Photography on an iPhone?

A long exposure of rolling dice shot with nothing but a tripod and my iPhone camera app
You can absolutely do long exposure photography with your iPhone. The only thing you need is an iPhone model 6 or higher.
The native camera app on the iPhone includes the Live Photos option. Live Photos records the action 1.5 seconds before and after you press the shutter button.
This lets you create looping gif-style images, but it also has an option for turning that Live photo into a long exposure.
This means you can use your iPhone’s camera app to do Light Painting, capture long exposures of flowing water, or capture just about any other classic long exposure idea.
How to Shoot Long Exposure Photos on an iPhone Using the Native Camera App
I’ve been having a lot of fun lately shooting long exposure photos using the native iPhone camera app.
I’m going to walk you through the process I use for casually shooting slow shutter speed picks.
1. Enable Live Photos
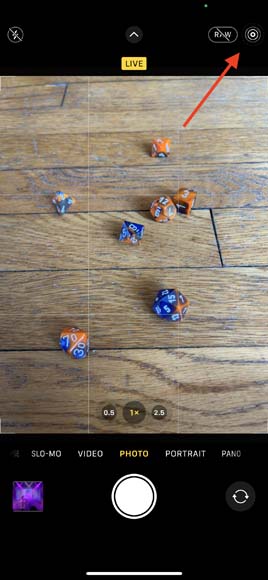
I typically leave Live Photos toggled off unless I know I’ll be looking for long exposures
The first thing you need to do is enable Live photos.
Just open your camera app, tap the live photos icon in the upper right, and you’ll have enabled one of the most creatively useful features in the iPhone camera app.
2. Take Your Long Exposure Photo
Now, you want to take your first long exposure pic with your iPhone.
I recommend taking some time to get comfortable shooting long exposure photography on a mobile device before you invest a lot of effort into setting up a complicated shot or staking out some nighttime long exposure locations.
You can get some easy practice by taking long exposure pictures of public transit, people watching crowds, or following my example and looking for some natural movement in your own home.
3. Open Your Photo in the Photos App
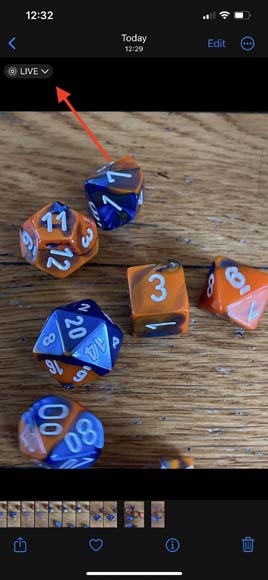
After taking a Live photo, you’ll have this new menu when you open the image in the Gallery app
After you’ve got your picture, you want to open the photos app and select the picture that you want to convert into a long exposure.
4. Tap the Live Button for More Options

You’ve got a few options to experiment with, but today we’re focussing on the Long Exposure option
In the upper left hand corner of your image you’re going to see the Live button. This will open up more options that you can do with a live photo.
5. Select Long Exposure

Select Long Exposure and Live Photos will convert your Live clip
Towards the bottom of the options is the long exposure setting. The iPhone app will convert that 3 seconds of video into a long exposure photograph after you tap this button.
Keep in mind that this might reframe your photograph slightly, so I always recommend shooting a tiny bit wider than you want your final composition to be. You can always crop later.
6. Edit and Share
I wrap up my long exposure iPhone photography with a quick edit in the Lightroom mobile app.
This is where you can make some composition corrections so you can really get the feeling of motion out of the picture.
What are the Best Third-Party Apps for Shooting Long Exposure Photography on an iPhone?
The native camera app isn’t the only way to shoot a long exposure on your iPhone. There are countless third-party applications that give you different ways of approaching a long exposure.
Here’s a quick list of a few highlights for a third-party long exposure app.
- Halide—The Halide camera app is great for long exposures because it features full manual controls as well as plenty of other extras that are great for people who want to do a bit more with their mobile photography.
- Pro Camera by Moment—Pro Camera by Moment also features full manual controls for your iPhone camera and it also has built-in profiles for each of the Moment lenses as well as a few other features.
- Shutter Stop—Shutter Stop features a Light Trails mode that is ideal for night time long exposures and it also comes with a few built-in ways to correct any fuzzy images.
- ProCamera—ProCamera gives you DSLR style controls over your iPhone including a shutter priority mode that’s great for a longer exposure.
Out of all of these, I found the Moment app to be one of the most useful.
Not only does it give you full manual control over your iPhone camera, but it also has built-in profiles for all of the Moment lenses.
When Should You Use Long Exposure on an iPhone?

Image Credit: Giovanni Calia
You can take a long exposure picture with your iPhone whenever you want. However, I’m going to give you a few situations that are ideal for a long exposure to spark your creativity.
Capturing light trails at night is a great way to get started with long exposure photography. Any dimly lit situation, like a nightclub or a concert, can also yield some great results when taking a longer exposure.
You can also capture great long exposures when you’re hanging out with your friends. This is a good way to capture dynamic movements where you can really show the energy.
Nature photography is another great place for long exposures. This allows you to highlight the movement of insects and animals or capture flowing water rather than freezing the action with a high shutter speed.
3 Tips for Taking Long-Exposure Photos on an iPhone
I’ve been taking my iPhone photography a lot more seriously lately and here are three tips that I found really helpful for my iPhone long exposures.
1. Shoot Steady
A tripod is a must-have accessory for long exposures
A slow shutter speed means that camera shake is going to be a real problem. Even the act of pressing the shutter button can create enough motion blur to ruin an otherwise perfect shot.
I strongly recommend shooting on a tripod when you’re doing long exposure photographs with your iPhone. This will go a long way to stabilizing your images.
If you want to take things to the next level, you can get a remote shutter release that connects to your iPhone over bluetooth. This eliminates the camera shake of pressing the shutter button.
2. Be Careful With Composition
Long exposure photography is at its best when you take a little bit more time with your composition.
A long exposure photo of a fast moving train is exciting, but it could be even better with a model in the foreground which could contrast the motion of the train and tell more of a story.
Don’t be afraid to try different angles, rearrange your composition, or ask a friend to stand in as a model to create some contrast to the fluid movement of a long exposure shot.
3. Take Multiple Exposures
Longer exposures let in a lot more light to your camera’s sensor than a fast shutter speed would. This means that it’s a lot easier to overexpose when shooting a long exposure.
There are some great guides to Low Light Photography out there, but a useful beginner tip is just to shoot multiple exposures. This is especially helpful if you’re using one of the apps that allows you to have full manual control over your iPhone camera.
Try using different shutter speeds, changing the ISO, or controlling the light in other ways like trying the same shot indoors or as the sun is setting.
If you want to get even more in-depth advice for your slow shutter speed photography, check out these Long Exposure Photography Tips.
FAQ
Which iPhone has long exposure?
The native camera app on iPhone has had the ability to shoot a long exposure photograph since iPhone 6. This means that you can take long exposures with any contemporary model of iPhone.
How do you do long exposure on iPhone Live Photos?
The first thing you need to do is enable Live Photos by tapping the Live icon in the upper right of the iPhone camera app. Next, take some pictures and you’ll see a Live icon in the upper left while viewing the image in your gallery. That lets you toggle between Live options including long exposure.
Can iPhone 13 do long exposure?
Every model of iPhone 13 can take a long exposure photograph using Live Photos. All you need to do is enable Live Photos in the camera app and then select a long exposure when viewing a Live photo in your image gallery.
Long Exposure iPhone Tips: Final Words
You can shoot captivating long exposures using the native camera app on your iPhone.
All you need to do is master a few of the basics of shooting with a slow shutter speed and learn a few tricks for making the most of your iPhone pictures.
I want to hear your favorite tips for shooting long exposures on your smartphone camera app.
Let me know in the comments and make sure to check out our other articles on iPhone photography tips.
The fastest, simplest and most fun way to improve your smartphone photography skills this year.
Use link to save 80%


Ashley is a photographer, writer, and film critic. When Ashley’s not writing essays on photography, cinema, and theory, he’s out taking pictures with retro film cameras.

WELCOME TO SHOTKIT
Enter your email to be sent
today's Welcome Gift:
19 Photography Tools
🔥 Popular NOW:


Shotkit may earn a commission on affiliate links. Learn more.