


How to Edit Photos on iPhone to Look Professional
Unlock pro-level photo editing on your iPhone. Dive into tools, tips, and techniques to transform your shots into polished, captivating images.
iPhone Photography | Learn | By Ashley Darrow
Do you want to know how to edit photos on iPhone to look professional using only the Photos app? Well, I’ve got you covered!
I do most of my photography and editing on my iPhone. I don’t always use the photo app, but I’ve used it before for professional work and it can definitely get the job done.

Want to learn how to take AMAZING photos with your iPhone? Discover hundreds of exciting secrets to totally transform your iPhone photography with this course!
Tap red button to save 80%
I’m going to walk you through everything you need to know to professionally edit photographs on your iPhone using nothing more than apps you already have installed.
You should also check our article on iPhone photography tips for some general advice and settings for your iPhone camera.
Table of Contents
15 Tips for Editing iPhone Photo Editing
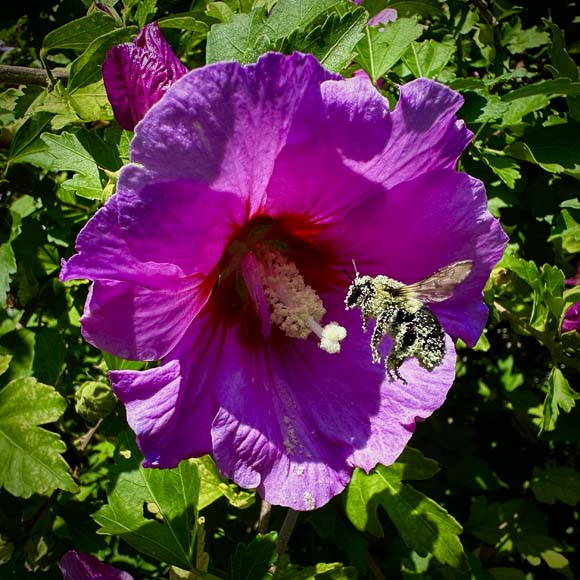
Shot on iPhone 14, edited using only the Photos app.
Not only am I going to give you tips for editing on your smartphone, I’m going to walk you through my mobile editing workflow treating each step as a unique set of tips.
This will give you the iPhone photography editing tips you’re looking for, and show you how I typically walk through a working photography edit.
1. Start Editing in the Photos App
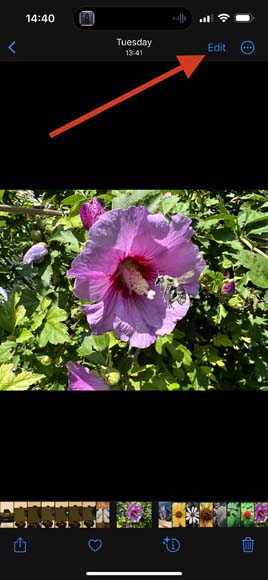
You probably already know where the editing button is, but you might not know that the iPhone photos app is fully capable when it comes time to edit pictures.
I’ve turned in professional-level work editing and nothing more than Photos. It’s definitely not as powerful as its desktop alternatives or even some of the other apps, but it is fully capable of helping you edit pictures like a pro.
You can tap edit on RAW, regular, and even edit live photos using this app. If you’re working with a live photo, you should pick your key photo before editing.
2. Try Out Auto Edit with iPhone Photos
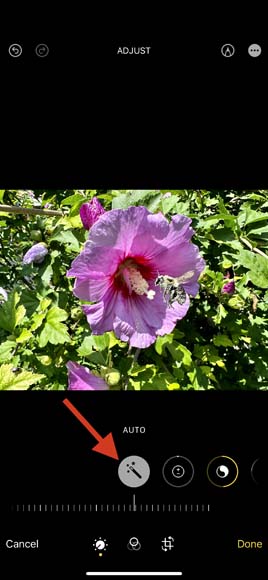
The auto editing button in photos definitely has a utility, but in my experience it’s a little bit hit or miss. here’s a few things that I do to make better use of the auto edit button.
There are definitely times when the auto edit button does a good job on its own. In my experience, the auto button does its best work on photographs that are already well exposed or biased towards the darker side of the exposure.
You can still get good results with the auto button, but you might need to lower your exposure a little bit to compensate for the brightness that this button has.
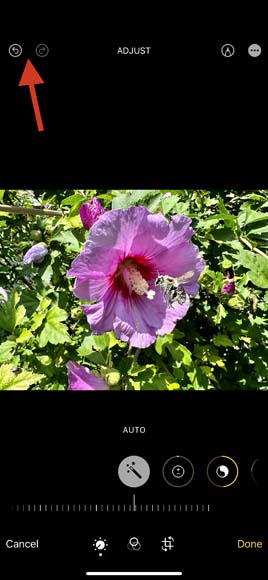
3. Undo iPhone Photos App Edits
Sometimes the auto edit is a bit of a mess. This is just as true for the photos app as it is for Lightroom.
Luckily, you have a one button solution to undo any edits that you make. In the top left corner of the screen you’ll find the undo and redo buttons.
Photo editing is all about experimentation and trial and error. Feel free to try out some edits that are outside of your usual style because you can just undo them with a few quick taps of a button.
4. Crop Before You Edit Photos
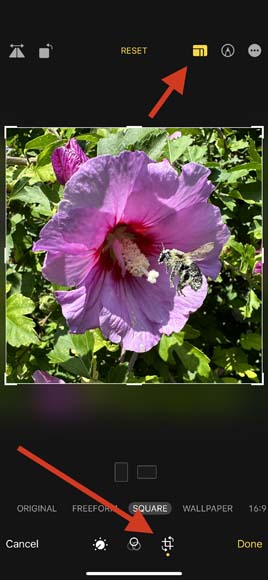
While I often start by tapping the auto button just to see what will happen, the true first thing I do in my edit is reach for the crop tool.
For this photograph, I wanted to go for a square crop that highlighted the bumblebee in flight. A square crop would also be great on social media which is where this pic was headed.
In the Photos app, you can do freehand crop, or you can tap the button in the top right to crop photos with presets in both landscape and portrait mode.
You also have options to straighten your photo and adjust the vertical and horizontal skew. That’s right, you can do complicated geometric changes in the default iPhone photo editor.
5. How to Best Use Photos Exposure Controls
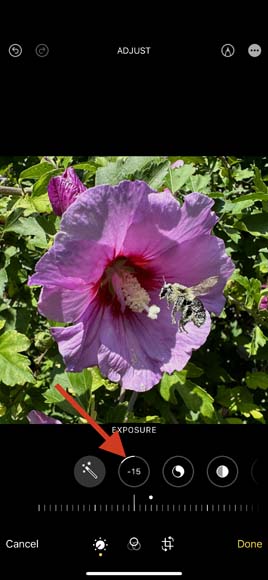
I found that the iPhone tends to take its best pictures either in the morning or at twilight. It’s great with this low light photography, but it can often overexpose shots taken during the day.
That’s why I always check in with the exposure tool in the photos app. You’ll see a lot of people suggesting that you increase the exposure on your image, but I actually prefer to lower my exposure on most shots.
Mobile photography tends to bias brighter than you would get with either film or a mirrorless camera which makes using the exposure tool even more valuable.
6. What is Brilliance and How to Use It?
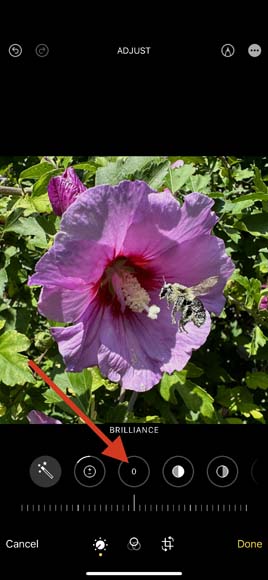
Brilliance is a unique editing tool in the Photos app that blends exposure adjustment with contrast editing.
Brilliance will make pretty noticeable changes to the exposure of your photograph and will also make more subtle changes to the contrast to blend the overall effect.
I recommend it with either picking Brilliance or exposure to make a first pass in the editing. Using both can result in images with either too much contrast between the highlights and the Shadows or create some pretty noticeable overexposure.
- How to use iPhone Live Photos
7. Fine Tune Your Highlights, Shadows, and Black Point
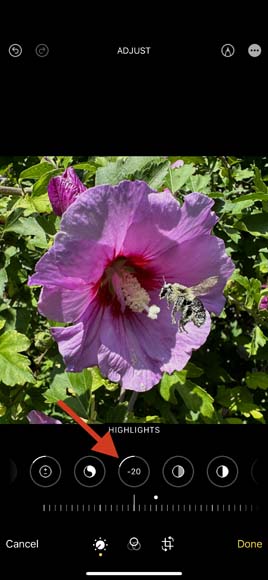
The Photos app starts to feel like a fully featured piece of photo editing software when you get deep into it. You can adjust your highlights, your shadows, but most interestingly of all it allows you to control your black point.
The black point tool is the point at which the darkest shadows on your photograph have absolutely no detail.
Digital photography tends to be very forgiving with underexposing and having this level of freedom with adjusting your black point is a great way to add a filmic quality to your photography.
See more iPhone camera features.
8. Find a Balance Between Contrast, Brightness, and Saturation

Editing tools like brightness, contrast, and saturation are three closely related settings that are going to help you adjust the overall feeling of your image. Adjusting these three together can help you overcome images that look muddy or images that are just a bit too loud.
I often find that brightness is the editing setting that I use the least because I get most of what I’m looking for in brightness by correcting my exposure and doing some color correction.
The contrast tool does a lot of work in helping you transform a quick shot into a properly edited photograph.
9. Try Adjusting Your Vibrance
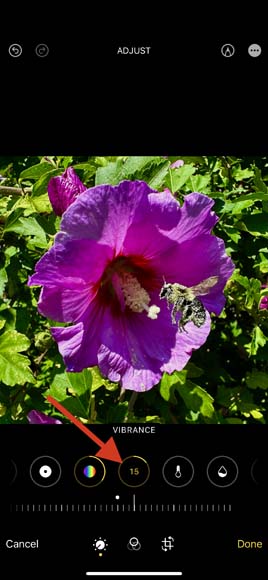
If saturation affects the entire image, vibrance is a much more nuanced tool. Vibrance is a photo editing tool that’s going to increase the saturation for colors that are already muted in your image.
If your photograph is feeling a little dull and lifeless, I really recommend turning up the vibrance. Remember, a little adjusting on the vibrance goes a long way.
10. Creating Unique Warmth and Tint
Warmth and tint are two very related editing controls and you can find both of them in the Photos app.
Warmth adjusts the levels for red, yellow, and orange while tint adjusts magenta and green.
You can go really easy with warmth and tint to add some subtle shifts in your image or you can crank either of these settings to 11 in order to get a very dramatic effect.
A quick tip is turning up the warmth just a little bit to give your photograph a slightly yellowed, retro look.
11. Clean it Up with Sharpness, Definition, and Noise Reduction
Photos doesn’t just have photo editing tools for dialing in the aesthetics of your image. This photo editor also has the ability to help you clean up an image that might be distorted or grainy.
There’s some debate about whether you should clean up your image before or after doing the rest of your edits. I am strongly in favor of adjusting your sharpness, definition, and doing any noise reduction as one of the final steps of your edit.
In fact, the only things I do after these edits would be adding a vignette or a border to my images.
You never really know what your final image is going to look like until you’ve done all of your edits. That little bit of noise or lack of sharpness might not be such a problem by the time all of your other edits are done.
Likewise, adjusting noise and sharpness too early might jeopardize your ability to get the professional edits you’re really after.
12. Add a Vignette
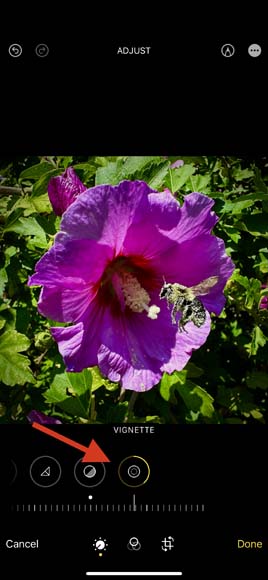
Adding a vignette to your photographs has a little bit of a bad reputation in the professional photography scene. This is because beginner photographers tend to be very heavy-handed with their vignetting making the edit look clumsy and more than a little obvious.
However, adding a subtle vignette here and there really helps to focus the viewer’s eye on the center of your photograph and can help downplay any distracting elements at the edges of your frame.
13. Use Filters for a Quick Edit

Filters are a great way to do a quick edit on your images. If I’m just posting something quickly to social media, I’ll often just give the image a quick crop and then apply one of Photos preset filters.
iPhone camera filters include vivid, cool, dramatic, and a bunch of different combinations of those basic filters. Remember, you can always combine filters with other edits such as fixing up your exposure or sharpening the image before or after adding your filter.
14. Revert Your Changes for a Fresh Start

Don’t like any of your changes? Well, even after you finish editing you can always tap revert your image back to exactly what the picture looked like when it was shot.
Photos retains the full detail of the original picture whenever you start editing. This means you don’t have to permanently lose anything to a crop, drastic contrast changes, or even critical mistakes made during editing.
Here’s a bonus tip. I often save a duplicate of an image after I’m done editing and then revert the original if I want to give it a second pass with a fresh edit. This way I can compare the final products side by side.
15. Third-party Editing Apps (That are Better for Editing than iPhone Photos)
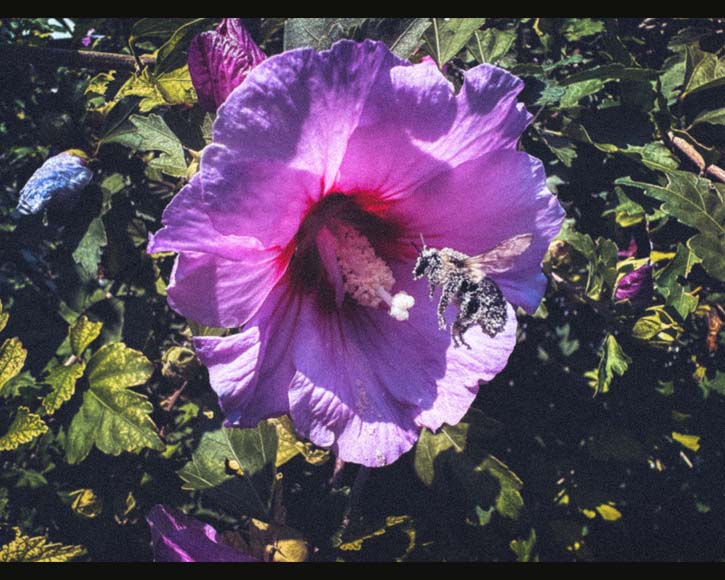
Same photo, but this time edited with Lightroom instead of just Photos. I used Lightroom to go for a retro-film look.
The iPhone Photos app is a great option for editing, but in my opinion there’s nothing better than Lightroom for mobile editing.
Lightroom has translated most of its key features over to the mobile version. I really don’t feel like I’m missing too much outside of a few utility features that make it easier to handle large batches of edits.
If you’re not an Adobe fan—and that’s understandable—here are a few other photo editor apps for iPhone you might want to check out:
- Snapseed
- Pixelmator
- PicsArt
- VSCO
- Carbon
There aren’t too many iPhone photo effects, so picking one of these apps gives you an edit mode full of photo filters and even tools for videos.
Most of the best iPhone camera apps have basic editing tools as well, so you might want to check them out too.
Wrapping Up How To Edit Photos On iPhone To Look Professional
You’ve now got all the tips you need to start doing professional photography edits on your iPhone.
To be honest, the cameras available on the iPhone are some of the most accessible options for photographers looking to do pro-level work on a budget.
If you’ve got a burning question about the world of mobile photography, let me know in the comments. I’ll either give you an answer here on this article or get to your question in a future guide.
Want to learn how to take AMAZING photos with your iPhone? Discover hundreds of exciting secrets to totally transform your iPhone photography with this course!
Tap red button to save 80%


Ashley is a photographer, writer, and film critic. When Ashley’s not writing essays on photography, cinema, and theory, he’s out taking pictures with retro film cameras.

WELCOME TO SHOTKIT
Enter your email to be sent
today's Welcome Gift:
19 Photography Tools
🔥 Popular NOW:


Shotkit may earn a commission on affiliate links. Learn more.