


How to Use iPhone Burst Mode (+ Handy Shortcuts)
Everything to know about iPhone’s burst mode so you never miss a great action shot again, plus some tips on when to use it and how to turn it on/off quickly.
iPhone Photography | Learn | By Ashley Darrow
One of the most under-appreciated mobile photography tools has to be iPhone Burst Mode.
This guide is going to give all you mobile photographers all the tips you need to make the most of Burst photos.
Bust photo mode allows you to shoot 10 photos per second when you press the shutter button.
https://shotkit.com/edit-photos-iphone/

Setting a timer on your iPhone is a basic skill - learn much more exciting secrets to totally transform your iPhone photography with this course!
Tap red button to save 80%
This is perfect for anyone who’s been struggling to capture action shots on their iPhone camera.
Burst Mode captures things that other techniques just miss.
Shooting in Burst Mode has definitely improved my photography and it can give yours a burst of creativity!
Table of Contents
What Does iPhone Burst Mode Do?
Burst Mode is a feature that allows you to take 10 photos per second on your iPhone.
This is great for capturing action shots or making sure you get a good smile from the kids while they’re busy playing in the yard.
Burst Mode works by capturing continuous images for as long as you hold down the button.
The iPhone Camera app then generates a “Burst photo” that contains each individual image from your Burst shot.
The Photos app automatically selects a few highlights from your Burst photos, but you can also pick your favorites to edit or share.
How Do You Use iPhone Burst Mode?
You’ve got three options for using Burst Mode on iPhone.
I’m going to start with the always-on default option, but then cover a few of the more exciting ways to make the most of this feature.
Method 1: Holding Down the Shutter Button

Slide the shutter button left in portrait mode or down in landscape for Burst Mode.
The shutter button is an always-on option for taking Burst photos. No matter what other settings you have, you can always use the shutter button to activate the iPhone’s burst mode.
If you have an iPhone model X or earlier, all you need to do is hold the shutter button down.
If you have a model iPhone Xs, Xr, or newer, you need to hold the shutter button down then swipe it left.
Method 2: Volume Up Burst Mode
You can also enable pressing the volume up button to control Burst Mode. This makes the volume up button act as a secondary shutter button for your iPhone’s camera.
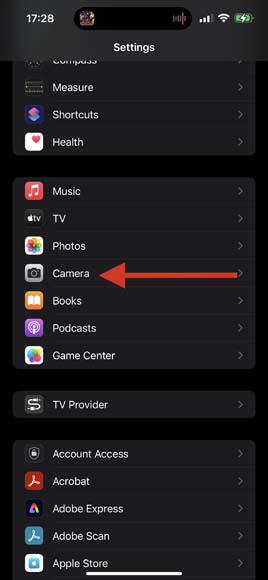
The first thing you need to do is navigate to your settings menu and find the iPhone camera settings.
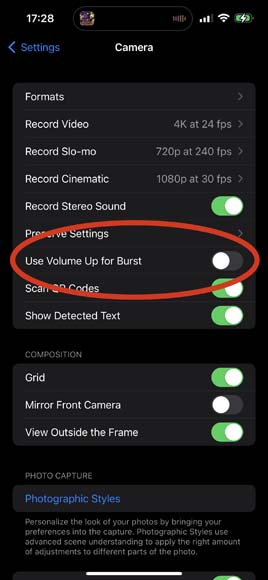
You can then toggle Volume Up for Burst on. This is only available on newer model iPhones.
Method 3: Self-Timer Burst Mode
The self-timer shoots in Burst Mode by default. You just need to make sure your settings are right before taking your first shot.
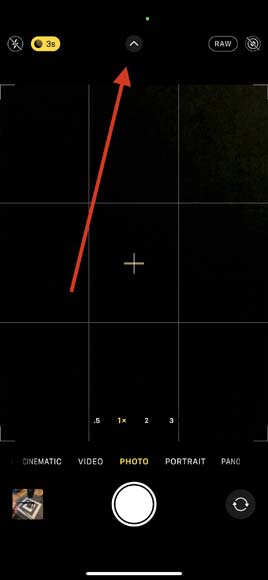
All of the best camera features are hidden behind the button!
First, expand the camera menu by clicking the icon at the top of the app.
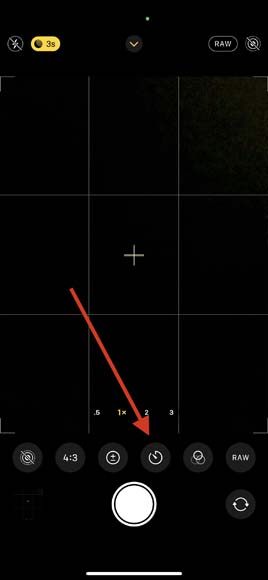
Next, tap the self-timer button and select your timer options.
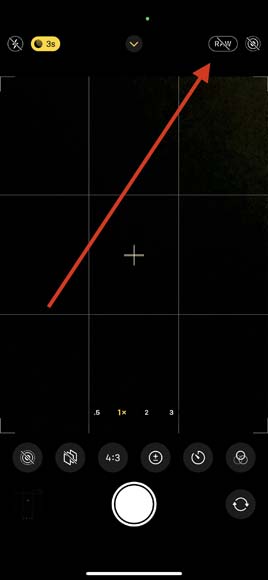
In almost every other instance I’d say to shoot RAW, but sometimes we have to let go of editing utility.
The last thing you need to do is make sure RAW or HDR mode is toggled off. These modes override Burst Mode so they need to be off before you can shoot self-timer Burst photos.
When to Use Burst Mode on iPhone
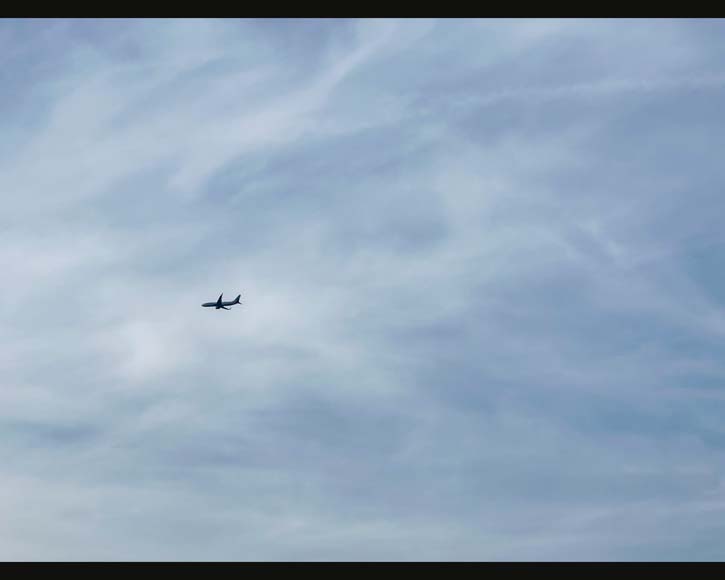
Shot using Burst Mode on iPhone 14.
Here are a few tips on when you can get the most out of Burst Mode.
Burst Mode does its best work when you’re dealing with a fast-moving subject. Sports, children, or vehicles are all good candidates for multiple high speed photos.
I also like using Burst Mode when I am not very stable. Whenever I try to get a good shot on a train or at a concert, I often turn to Burst Mode to give me multiple photos to work with when it comes time to edit.
I also recommend Burst photos for when you’re not sure about a composition or subject. You’ll have dozens of individual shots to work with which I much prefer to missing the shot altogether.
Another useful application of Burst Mode is for taking photos of real estate with an iPhone, where having at least one sharp, in-focus picture is obviously the goal.
When Not to Use Burst Mode
Burst Mode is great, but sometimes you don’t want to use this iPhone camera mode. There aren’t too many downsides to Burst photos, but here are a few that make me use other modes more often.
The first issue is storage. A Burst photo with 50 shots takes up as much storage as 50 separate pics in the Photos app. This can be a major iCloud storage killer.
It’s also a pain to sort and edit all those Burst photos. More often than not, a single pic will do.
It’s also good practice to train your hand and eye as a photographer. Relying on Burst Mode could be holding back core skills like composition and holding a steady camera.
How to Disable Burst Mode on Your iPhone
Unfortunately, there is no way to disable Burst Mode on your iPhone. This isn’t a feature that you can toggle on and off, but you can make it harder to accidentally take Burst Mode photographs.
Disable Volume Up Button Bust Mode
The volume up button is used to control the Burst feature on the iPhone. This can create an annoying problem where you accidentally hit the volume button and capture a bunch of unnecessary Burst photos.
I had this problem all the time until I went into the settings and turned off the volume up Burst control. Here’s how it’s done.
The first thing you want to do is open up your settings and find the option for your camera settings.
Next, you can scroll down in the menu until you find the volume up toggle for controlling Burst photographs. Go ahead and toggle this one off and save yourself plenty of time dealing with extra Burst photos.
Remember, Burst photos take up a lot of extra space on your phone and on your iCloud storage account. Accidentally taking Burst photos eats up precious storage space.
How to Delete Redundant Burst Mode Photos on iPhone
Speaking of Burst photos taking up a lot of storage space, I’m going to show you how you can delete redundant Burst Mode photos and pick the ones you want to keep.

Your first step is to open your Burst pic and tap the word “Select…” down at the bottom of the image. When you tap select, you get access to all the photos you’ve taken with that Burst shot.
Now you can scroll through the multiple shots inside of your Burst image. Here are a few tips for picking the perfect moment in your captured photos.
- Consider the composition to find the right shot
- Think about how you will edit the photos on iPhone to look professional
- Look at facial expressions, lines of sight, motion blur, and just about anything else you’d normally look for in a good pic
How Do You Send Burst Photos on iPhone?
You’ve really got two solid options for sending Burst photos.
The easiest is just to airdrop the entire Burst photo. This keeps the Burst photo together and your friends can save it to their camera roll.
However, this doesn’t work at all if you’re hoping to post to Instagram or send—more manageable—individual pics. Here’s how you can send a Burst photo to just about anyone.

First up, we’re going to find our Burst photos. These utility albums in the Photos app are incredibly useful for finding specific media types.

Alright! Now we’re editing!
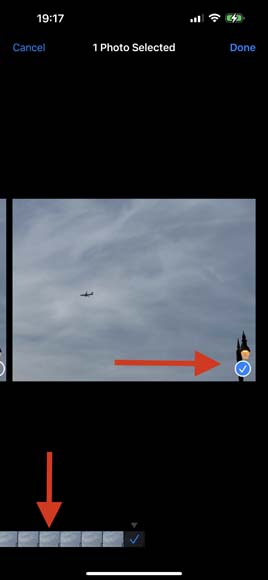
Just like sorting through thousands of shots after a wedding, we’re going to pull our selects from the Burst photos. There are usually two or three I like enough to edit and share while the rest are safe to delete.
Once you make your selections, you can save the pics to individual files. From there, you can edit and share as needed!
FAQs About iPhone Burst Photo Mode
How do I take multiple Burst Mode photos with the timer on my iPhone?
Burst Mode is enabled by default when you use the timer feature in the iPhone Camera app. If you’re not getting Burst photos with this feature, you need to make sure that you turn off RAW photos. Having RAW photos enabled turns off the Burst Mode feature that is normally on with the timer.
Can I turn off Burst Mode when using the self-timer on iPhone?
You can’t directly turn off iPhone Burst Mode when using the self-timer, but you can make the camera app take a different type of photo instead. The easiest way to do this is to enable Live photos which cancel out Burst Mode. Depending on which model iPhone you use, HDR and RAW mode also disables Burst Mode.
What are the best Burst Mode settings?
You’ll get the best results on iPhone Burst Mode by either shooting with automatic settings or by finding your exposure before shooting.
Final Thoughts on iPhone’s Burst Mode
Burst Photo Mode is an incredibly useful tool built into the iPhone camera. Burst Mode is a must-know feature if you want to make the most of mobile action photography.
There are countless tools in this app which makes it hard to keep track of everything. That’s where I come in!
Leave a comment below with your iPhone photography questions and I’ll either respond to your comment or cover your question in a future article!


Ashley is a photographer, writer, and film critic. When Ashley’s not writing essays on photography, cinema, and theory, he’s out taking pictures with retro film cameras.

WELCOME TO SHOTKIT
Enter your email to be sent
today's Welcome Gift:
19 Photography Tools
🔥 Popular NOW:


Shotkit may earn a commission on affiliate links. Learn more.