


Guide to the Rule of Thirds in Photography
Learn how to use the rule of thirds to improve your photography composition! Includes 5 pro tips + 15 examples from landscape, portraiture and more.
Learn | Photography Guides | By Teryani Riggs
What makes some photographs more pleasing than others? It’s not just the quality of the light or the vibrance of the colors, or even how cool or unexpected the subject is.
Where you place the different elements in your image can really affect the impact it has on the viewer.
Many beginners automatically assume that the main subject or the horizon should be placed in the middle of the photo, but that’s often not the most pleasing or most balanced place to position them.
That’s where the rule of thirds can really improve your photos… and luckily, understanding the rule of thirds is actually pretty easy!
In this article, we’ll take a look at the rule of thirds for beginners and get you well on your way to improving your composition.
Table of Contents
What is the Rule of Thirds in Photography?
The rule of thirds is the most common off-center composition technique used in photography.
It consistently produces excellent results, and it’s not just for beginners – professional photographers use it all the time.
Using the rule of thirds is a great way to progress from center composition when learning photography.
At its most basic, the rule of thirds states that placing the key elements on the “thirds” of a picture is more pleasing to the eye than centering the subject or creating symmetry.
The thirds of an image can be found by dividing an image into nine equal parts, with two equally spaced vertical lines and two equally spaced horizontal lines. The lines run along the “thirds” of the image.
Placing your focal point(s) on these thirds – and especially on the intersection points – often creates a pleasing, balanced design.
Why do we use the rule of thirds?
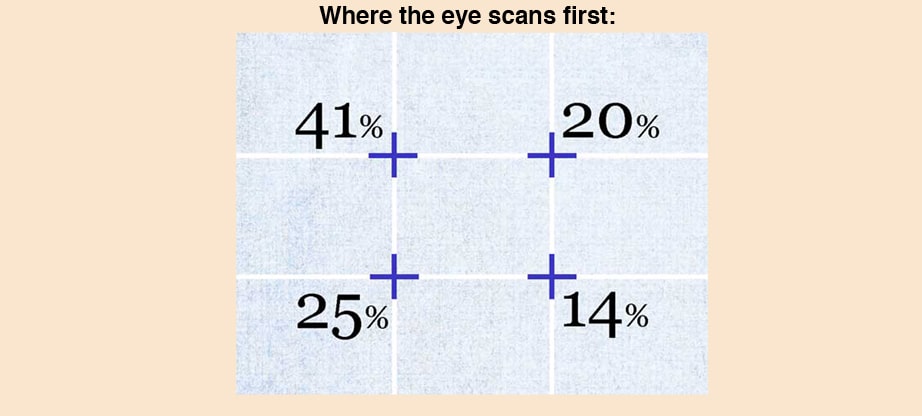
Research shows that a viewer’s eye is naturally drawn to the top left third first, the bottom left third next, then the top right, and lastly the bottom right. These intersections are the “power points” of an image or design.
We use the rule of thirds for a few different reasons.
- It creates pleasing aesthetics.
- It creates balance when you wish to show a large portion of the background or have a lot of negative space. The key elements occupy one-third of the scene while balancing out the negative space in the remaining two-thirds of the image. This looks and feels right to the viewer.
- In website and graphic design, it allows the designer to place the object/text of greatest interest on a “power point” – the place where a viewer’s eye will go first.
- It allows the photographer to take the viewer on a visual journey through their photograph. With the key element off to the side, the eye first goes there and then has the opportunity to wander throughout the rest of the image. (With the subject centered, the eye lands on the subject, but then has nowhere else to go.)
Do you have to follow the rule of thirds?
No, you don’t always have to follow the rule of thirds. In fact, doing so might weaken some of your images.
The rule of thirds is just one composition technique among many, and while it’s an excellent one, it’s certainly not meant to be used in every situation.
Sometimes it will make more sense to center the main subject or create a sense of symmetry by having elements of visual interest mirrored on each side.
Other times, an off-center composition like the rule of thirds will suit your subject best. This is where your own creativity and aesthetic sense comes in.
When would you not use the rule of thirds?

The rule of thirds is just one composition technique among many. In the photo above, a center focus (in this case radial balance) makes for a stronger image. | Credit: Teryani Riggs
There are plenty of situations where the rule of thirds is not the best composition choice. Oftentimes objects with striking symmetry have much more impact when placed in the center of an image.
Other times, you might want an image to be bisected so that you can give equal weight to the top and bottom or two both sides.
It’s also useful to center a subject when you’re not wanting anything other than the subject to feature in the frame and/or you don’t have any negative space to balance out.
Another great time to “break” the rule of thirds is when leading lines are a main feature in your image or when you’re using elements in the scene to provide a frame within the picture.
- Other rules: What is the Sunny 16 Rule in photography?
In Use: 15 Rule of Thirds Examples
The rule of thirds works particularly well for just about all types of photography that include some kind of background in them.
In the images below we’ll start off with some examples from landscape photography, and then move on to a few other genres.
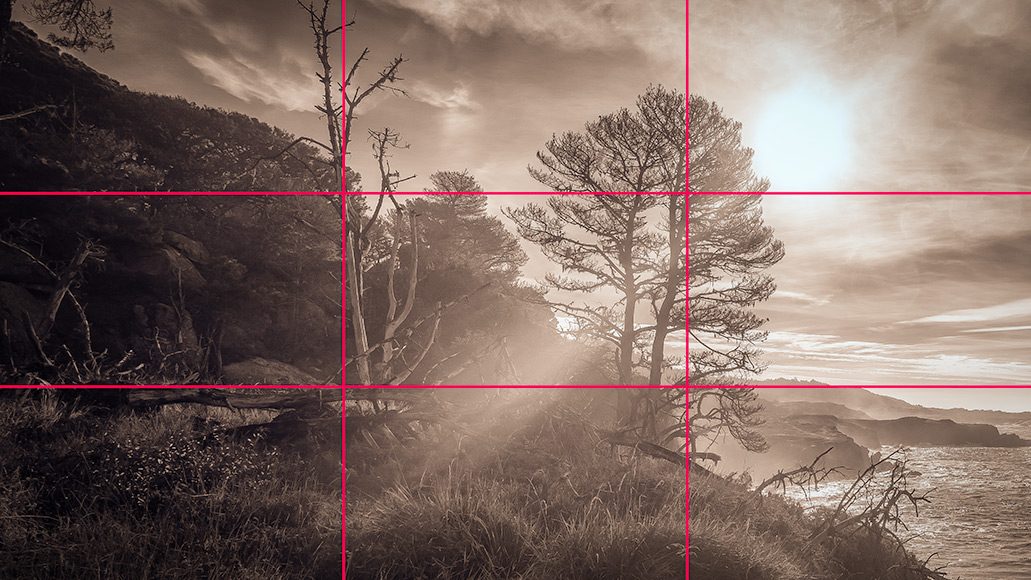
This first shot is a classic rule of thirds composition, where the horizon lands on the bottom line of the thirds grid (so the sky is featured) and the rocks land on both of the vertical lines.

In this classic rule of thirds composition in landscape photography, the horizon is placed on the bottom third and the rocks hit both of the vertical lines. | Credit: Teryani Riggs
In the image below, the lighthouse is set on the right-hand third of the image, nicely setting off the rocks and the sea to the left.
This brings the eye first to the lighthouse, then to the rocks below, and then out to sea and sky.

Here, the lighthouse is on the right-hand vertical line. | Credit: Teryani Riggs
In this next example, both logs from the Hoh River fall on the two-thirds. They also function as leading lines that take the eye downriver and off into the distance.

Here, both logs hit the vertical thirds. | Photo Credit: Teryani Riggs
Likewise in the pastoral scene below, the eye travels first to the main subject and then down to the bottom third before meandering into the rest of the scene.
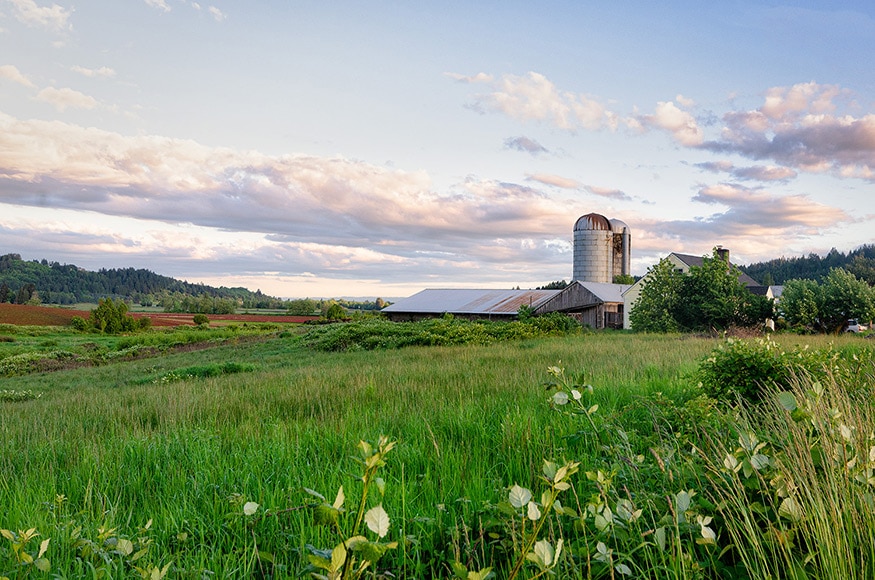
Credit: Teryani Riggs
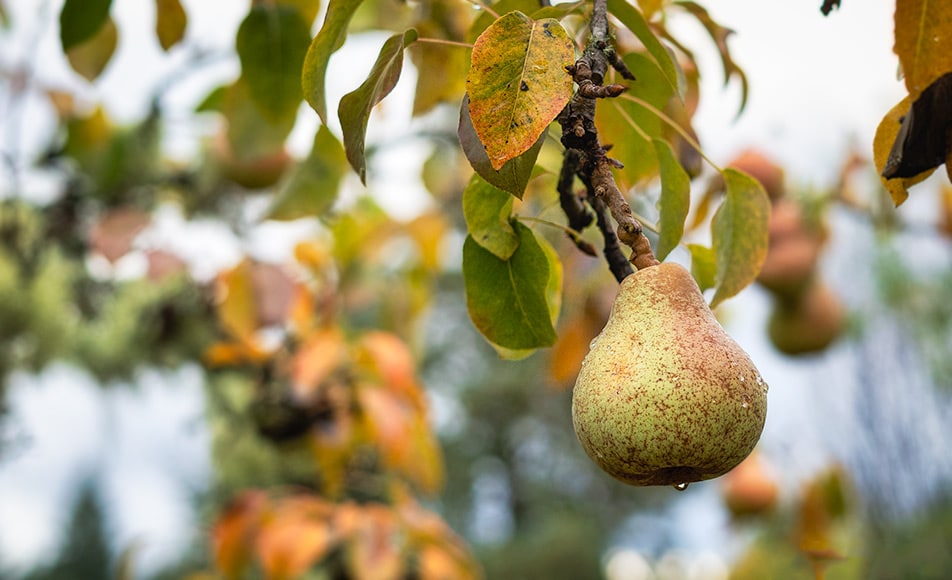
You can also use the rule of thirds in nature photography and close-ups.
Here, the yellow of the pistil and stamen is set on the upper third, bringing the eye first to it and then following the stalk down to the lower left-hand third.

Credit: Teryani Riggs
If you’re not sure where to place a single main element and you want to include the background, the rule of thirds is a safe bet.
Credit: Teryani Riggs
Moving on to documentation, this photo illustrating grafting has the action happening on the line of the bottom-left point.
There’s not really any need for the eye to wander off, but the framing allows for more of the hand and arm position to be illustrated (instead of empty space).
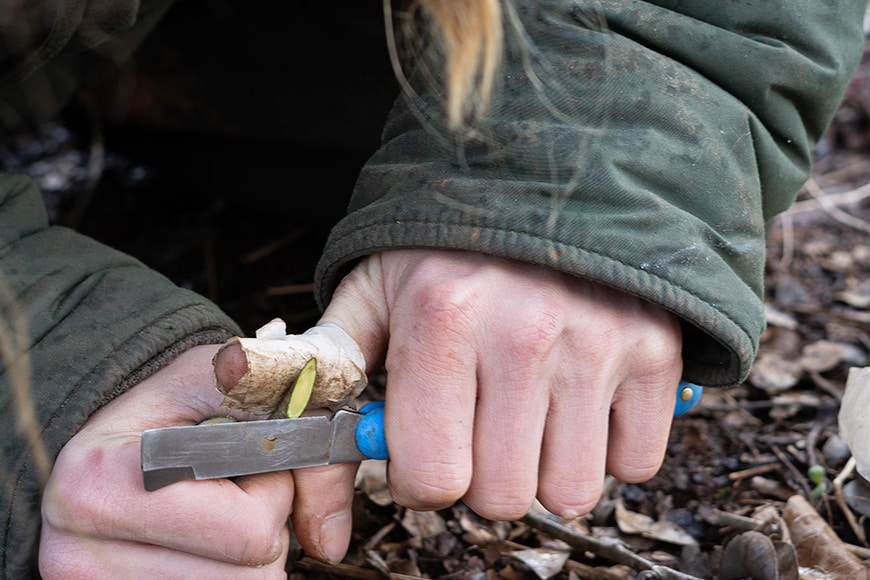
Credit: Teryani Riggs
In this photo-journalistic shot of a bedouin making bread, the stove captures the eye first, before allowing it to wander off towards the hands of the woman and the dough behind her.
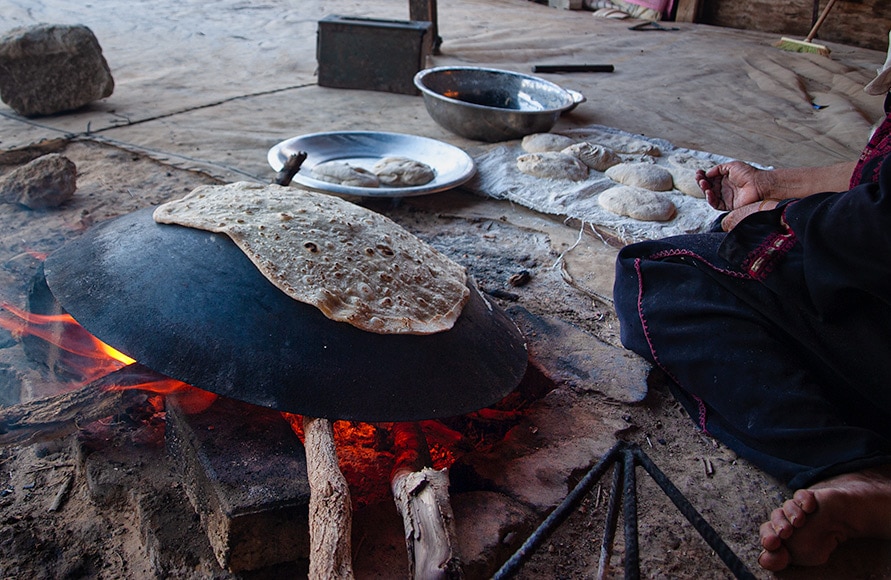
Credit: Teryani Riggs
How Does the Rule of Thirds Apply to Portraits?
The rule of thirds also works well when photographing people.
Many beginners assume that the subject in a portrait always has to be centered, but that’s not always the strongest composition – especially with lifestyle photos.
In other words, if you’re looking to capture more of the scene around a subject, the rule of thirds works really well.
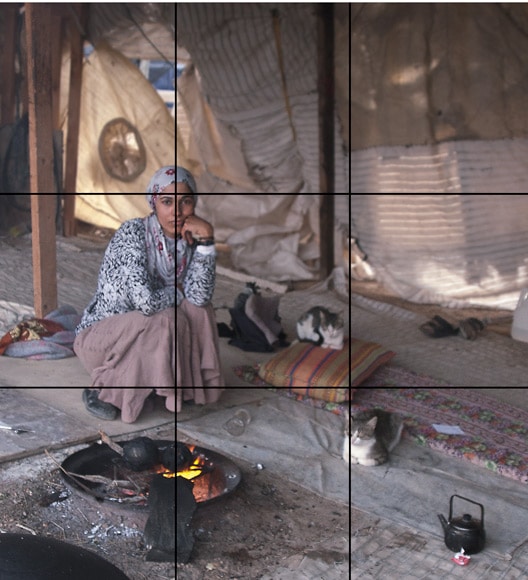
The rule of thirds grid is just a guidepost. Not all the elements of an image need to be lined up perfectly to get the effect. For example, in the image above, the tent post and pillow aren’t quite on the right third, but it’s close enough for the framing to work. | Credit: Teryani Riggs
Lifestyle portraits can look really powerful when you place points of interest where the lines of the thirds grid intersect.
In the image above, the face of the Bedouin woman lands squarely on the power point to the left, while her body sits on the vertical line. While the tent post and pillow aren’t quite on the right third, they’re close enough for the elements to balance each other out.
Where should the subject’s eyes be when using the rule of thirds?
In portrait photography, the viewer’s eye is almost always drawn to the eyes of the subject first.
Since the art of composition is all about where we draw the viewer’s gaze to and how we lead them through an image, where you position a subject’s eyes will be of supreme importance.
In general, it’s best to put the subject’s eyes in the top third. Also, the subject should be looking into the scene, not into the edge of the image.
This, of course, doesn’t apply if the subject is looking into the camera, but if they’re looking to the side have them looking into the photo.

Here the child is placed on the final third of the grid so that they’re looking into the photo, not on the first vertical third which would have them looking into the left-hand edge of the photo. | Credit: Teryani Riggs
Even if their eyes are closed or they’re looking up or down, it’s still best to have the subject’s face pointing into the scene rather than towards the edge of the frame.
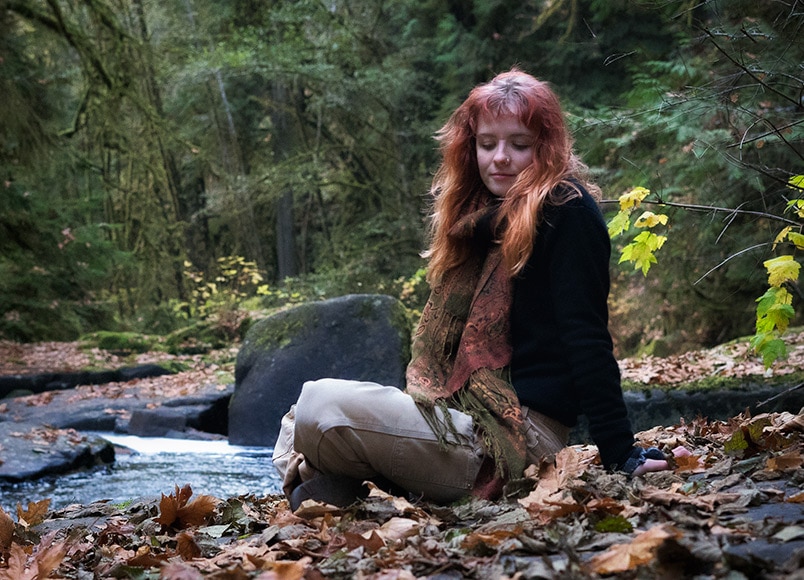
Even though the subject is looking down, they’re positioned so that their face is still pointed towards the center of the photo, not the left-hand edge. | Credit: Teryani Riggs
The rule of thirds can work well any time you’re capturing more than just the subject.
Below, the green of the grass and the red of the plum trees in the background are part of the overall scene, so the subject was placed on the last third (because they’re looking towards the first third).
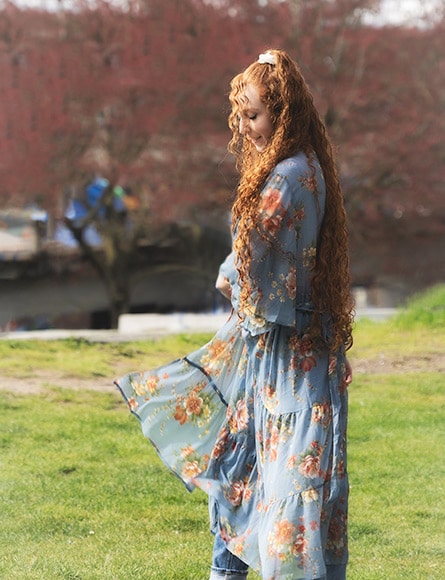
Credit: Teryani Riggs
The rule of thirds also works when placing people into larger cityscape/landscape photos.
(Taking this a step further, the iamge below also makes use of the s-curve in photography to generate additional interest.)

In this case, positioning the person on the first third of the scene adds balance to the rock and the negative space elsewhere. | Credit: Teryani Riggs
In the cityscape below, the water level is on the bottom third and the woman with the umbrella is on the left third.
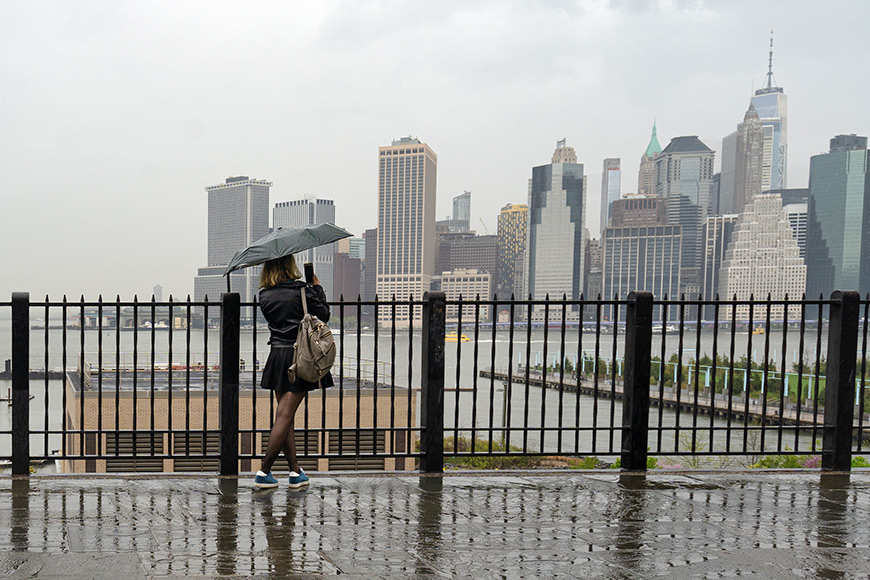
Credit: Teryani Riggs
The scene below is perfect for a rule of thirds composition. The corner of the wall lies right on the right third, as does the subject’s face and upper torso. His legs take up the rest of the space towards the left (on the bottom third) framing the negative space above.

Photo Credit: Teryani
5 Tips for Working with the Rule of Thirds
Credit: Teryani Riggs
While using the rule of thirds in your photography is pretty straightforward, there are a few things to keep in mind:
- In landscape shots, it’s generally best to place the horizon either on the top or bottom third, not in the center of the picture. The element that’s most interesting should get more space. For example, if the sky is more interesting, then place the horizon on the bottom third. If the foreground is more interesting, position the horizon on the top third.
- Place the main subject off-center onto one of the vertical lines of the thirds grid, ideally where the lines intersect.
- With portraits, it’s best to position the person on the third away from where they are looking (i.e. they should be looking into the center of the picture, not towards the nearest frame edge).
- It usually works best to have the subject’s eyes positioned on the top third.
- If a subject is moving, place them in a way that has them moving towards the center of the photo. This gives them space to move into.
Final Words
The rule of thirds is an easy way for beginner photographers to see the power of composing a subject off-center. It will almost always add a sense of dynamism and pleasing aesthetics to just about any photo where you want the eye to travel through a scene.
If you’re someone who has always centered your subjects, you might be amazed at how this technique might instantly improve some of your images.
(You may even be tempted to start cropping your old photos with editing software, now you know how to benefit from this technique.)
That being said, the “rule” of thirds is not a hard and fast rule – it’s more of a guideline that can be followed or not, depending on the needs of your composition. So learn it, start practicing – then don’t forget to break it!
Rules are meant to be broken… at least sometimes.
What do you think? Feel free to share your comments or questions below.


Teryani Riggs (they/them) is an adventure, who loves all things wild and free. Teryani can often be found in the midst of a social/eco-justice campaign, hiking through wild backcountry, or hitchhiking around the world listening to other people’s stories. While their focus has historically centered on landscape, travel, and wilderness photography, they’ve also been hired to shoot genres as varied as historical fiction reenactments in the studio to product and food photography.


WELCOME TO SHOTKIT
Enter your email to be sent
today's Welcome Gift:
19 Photography Tools
🔥 Popular NOW:


Shotkit may earn a commission on affiliate links. Learn more.